Free tutorial - How to paint eyebrows by Silviacreations
Hi ladies, some time ago I asked in the forum wich mini tutorial would you like to see from me. Lot of your answers was about eyebrows. So well, I have make a quick tutorial, some of that are a pic of my own drawing in a paper and the rest are using the computer with pictures from my dolls. As you all know english is not my maternal language so in any case there's something you don't understand just ask and will try to explain better.
1. Step 1, where to place the eyebrows.
I have to say that lot of ladies put the eyebrows in the wrong place lot of times, so I want to tell you some tips to place them near to the perfect location. Most of kits have the superciliary ridges (the brow bone) well defined in the sculpt so in this case is easy to place the eyebrow in the correct size. For example:
In this case, Grace by Tina Kewy has the superciliary ridges well marked so is easy to place the eyebrow.

For example, other kits that have the brow bone well defined can be: Frieda by Karola Wegerich, Michelle by Evelina Wosjnuk, Will by Natalie Scholl, Reese by Andrea Arcello, Esme by Laura Lee Eagles, Lillebror and Sili by Sabine Altenkirch, Angel by Olga Auer, Livia by Gudrun Legler, Amber by Pat Moulton... just if you search on google for the blank kit you have to notice the bone.
In other cases the brow bone is not so marked or is marked more generally and here is when some artists are lost. Well, there's some complicated technical measures to place eyebrows in a face as our faces are composed by complicated system called golden section, but that's anatomy and it's complicated, so I have make an easy way you can place them very near to the correct place with some easy lines.
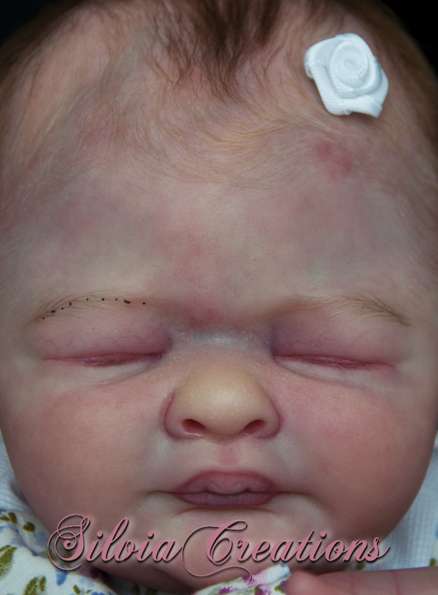
A clear case is Kase asleep by Realborn-Bountiful baby. Other faces similar to this are Leelou by Cassie Brace, Eliza by Donna Rubert, Pixie by Bonnie Brown, Birdy by Sandy Faber, Nicky by Christa Goetzen, Asher by Realborn-BountifulBaby ... etc
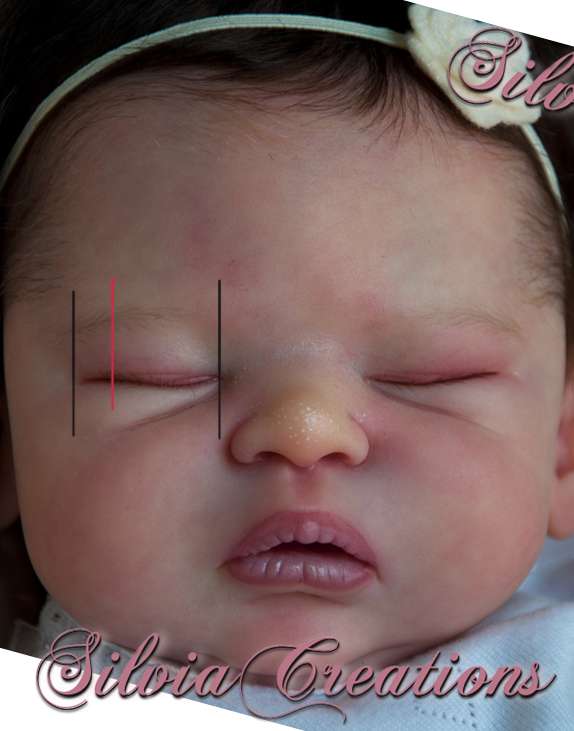
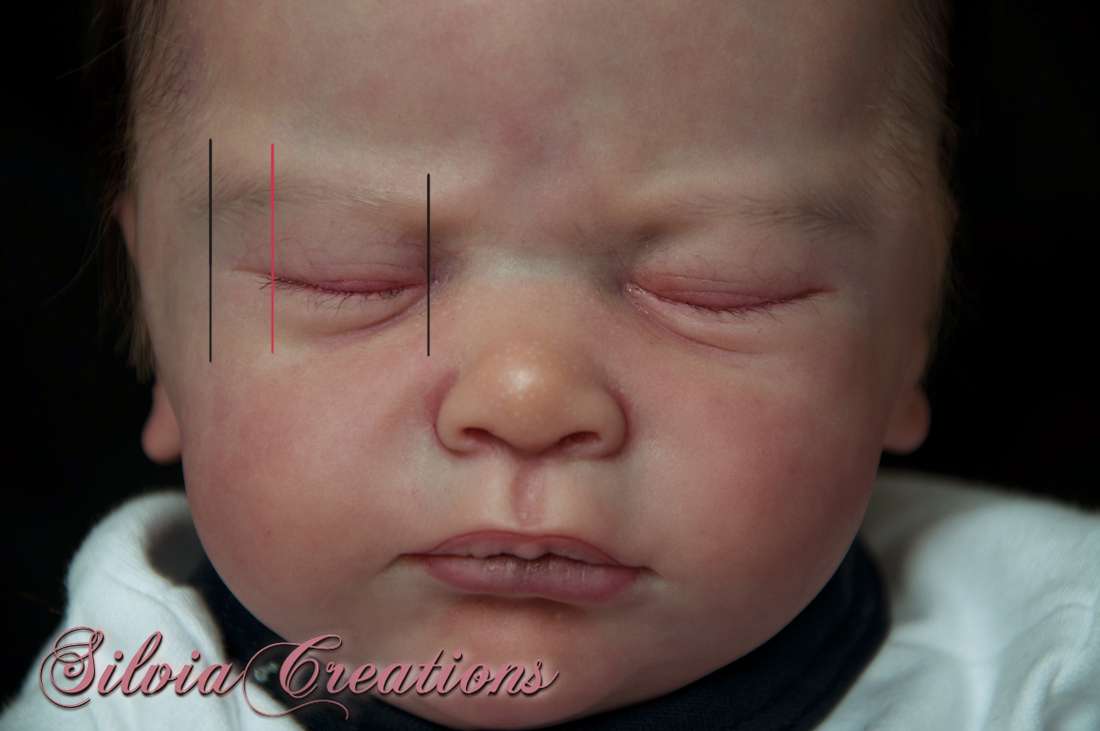
Here you can see the superciliary ridges are marked, but not the brow bone to place the eyebrows, in general, that faces are more relaxed than the ones that have it marked, as the muscle is relaxed too.
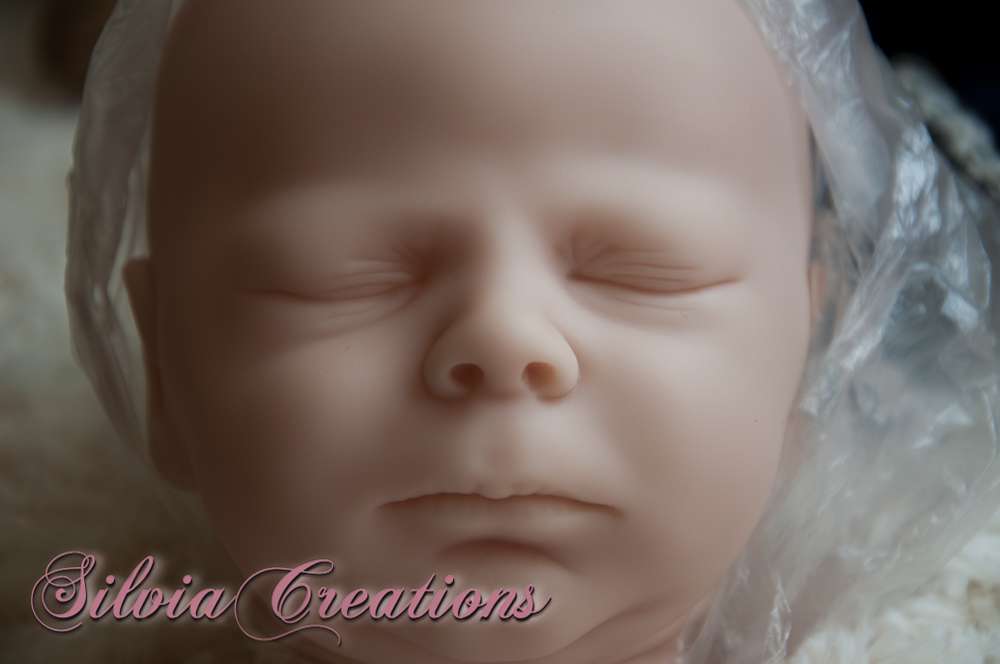
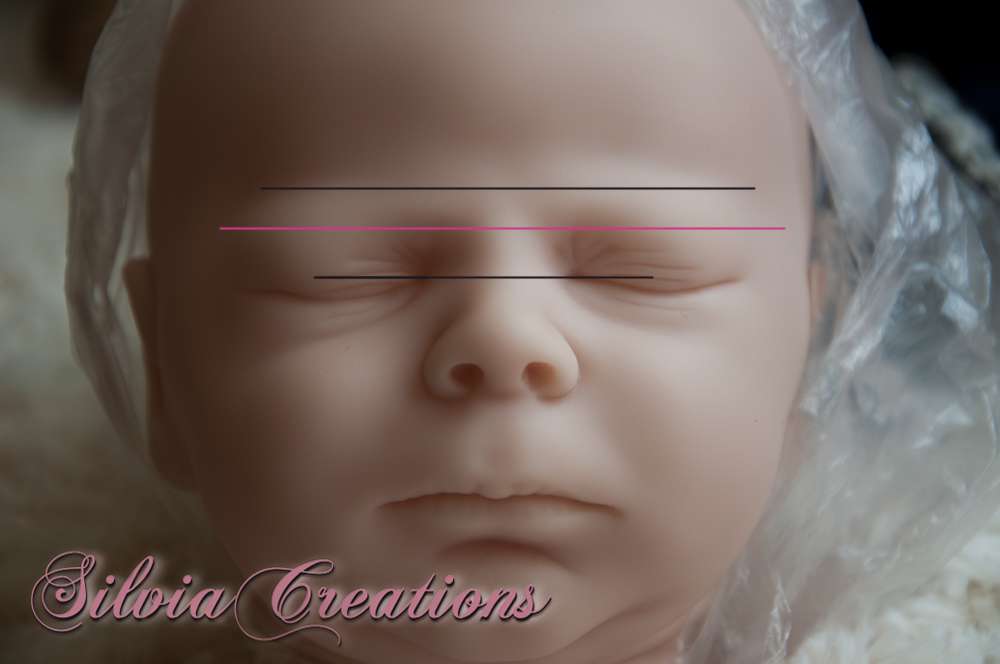
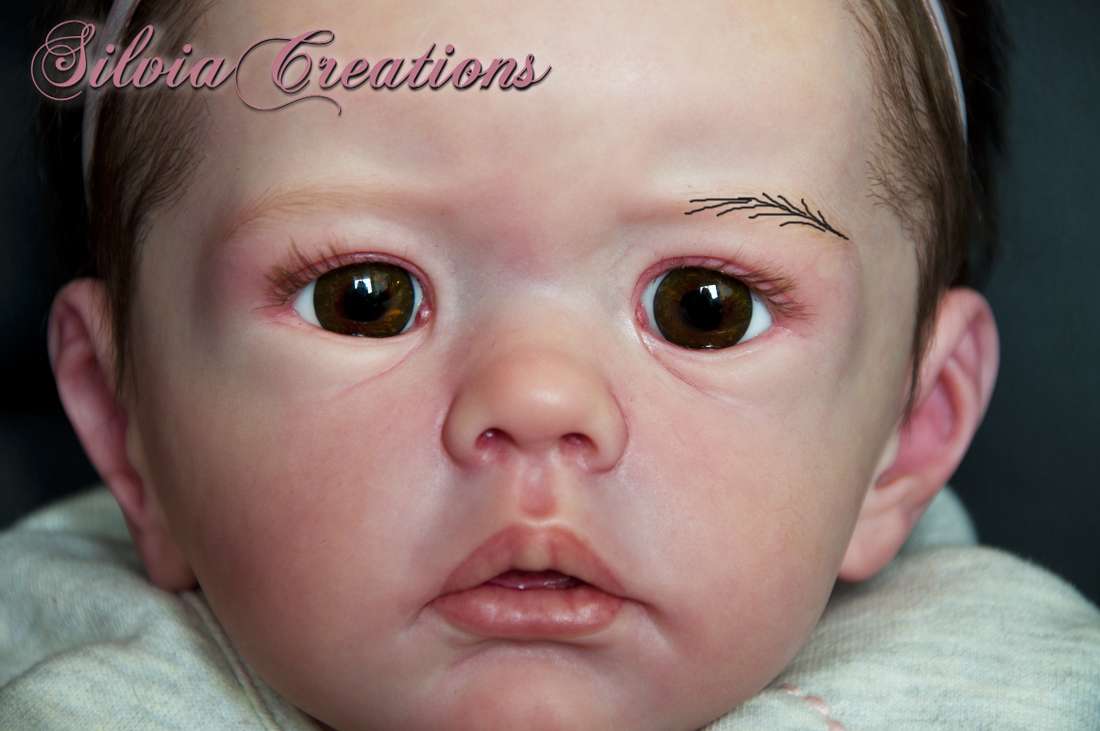
Then, I have make this easy diagram to decide where to put them. Just find the lacrimal and make an imaginary line. Now find the point where the bone starts to bump (in the pic above is just where the shadow ends and the brow bone bump out) and make another imaginary line. Now find a place in the middle of that two lines. **Attention! - sometimes that line can be just on the middle or can be a bit nearer to the upper line. This depends on the face, on the space between eye and brow bone, etc, so just is an guide to use when you have doubts**

An example on Leelou by Cassie Brace.

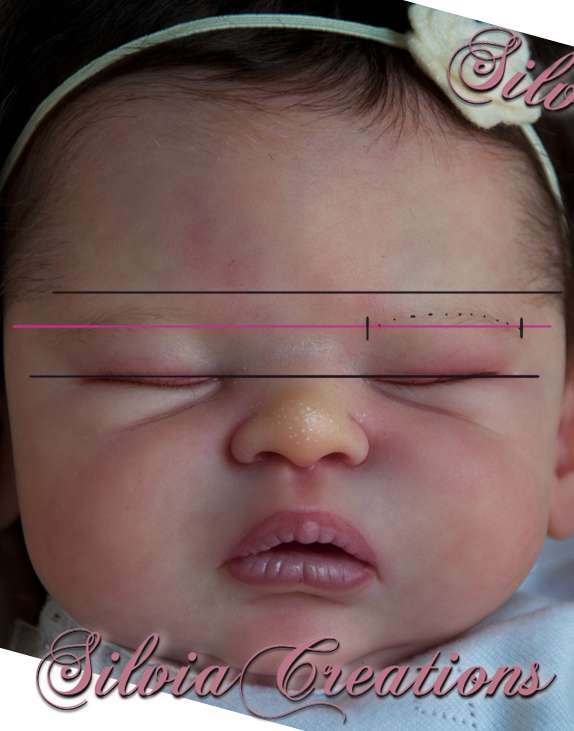
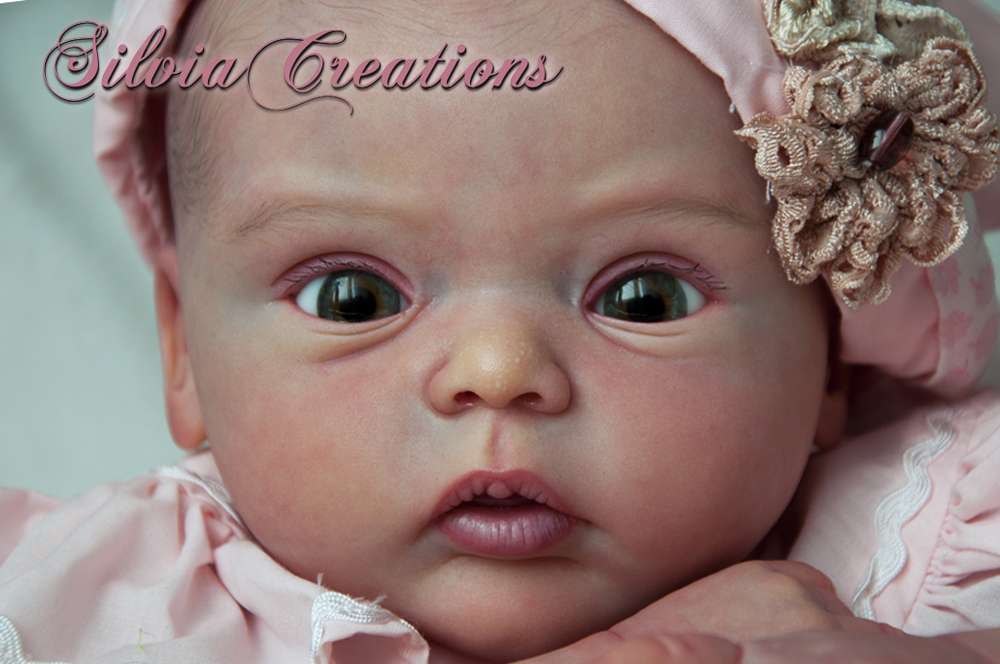
Then you can find the aproximate area to place your eyebrows. In an open eye baby should be the same, just the eyebrows will appear a bit close to the eyelide, but it's normal, the process is the same. Anyway if you feel they are very very close just put them some milimeters up. **There's an example on Wilma by K.Wegerich, wich have the brow bone marked and you can see is just an optical effect as on open eye babies brows looks closer - this picture have been retouched to show you the effect**

2. Lenght, and shape.
Now you have marked your place you have to know the lenght. Usually the lenght is from corner to corner to the eye, from the lacrimal to the corner. BUT sometimes people have the eyebrows a bit more longer than the corner, so, ALL DEPENDS on the character you want to give your baby, the look, etc, So again, this is an aproximate guide. I have babies with eyebrows to corner to corner and others with more longer eyebrows, this long also will change the face of your baby so eyebrows give a nice personality to a face.

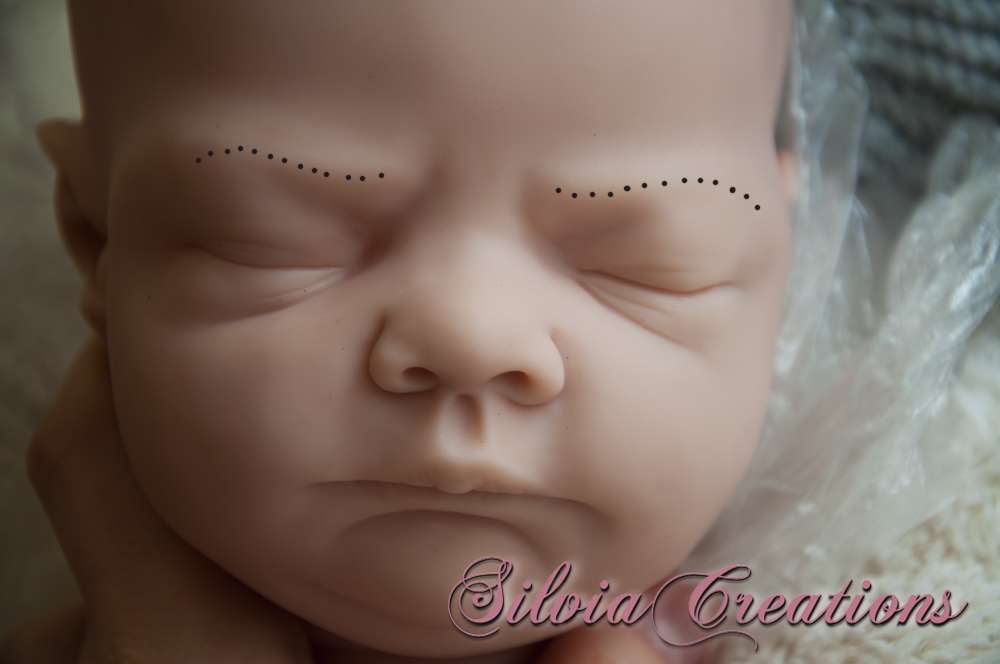
Now the shape, according to our imaginary lines the shape generally is a bit curve. You can see here again, the final shape is marked with dots.
3. Start to draw your eyebrows
For first times and for practice, you can mark the basic shape (like the dots in the pictures) to have it as a guide, when you have practice you maybe won't need the guide line.
Now we will add strokes in the lower part, closer to end will be shorter. Then we will add from the middle to the end, strokes up down, closer to the end they will be shorter too. This is the basic guide.
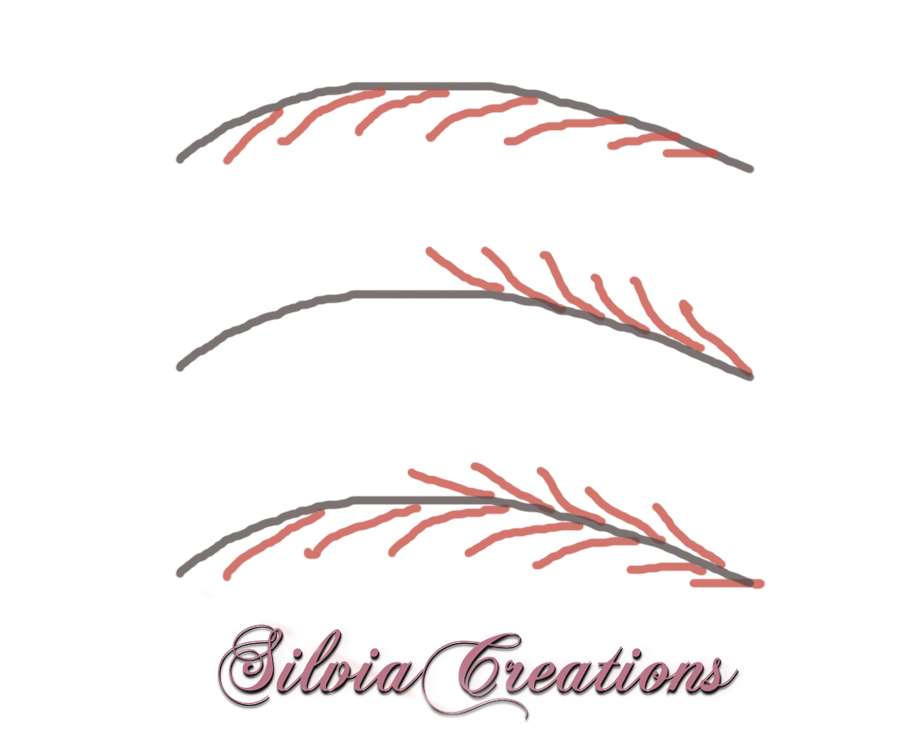
With the practice you will get a more natural shape and you will control better the strokes. Is not easy, this appears with lot and lot of practice. **ATTENTION: when you mark all these guide lines make it with very thin paint, when we be happy with the shape we can back and go over the strokes and mark them with a less thin paint to make the final eyebrows.**
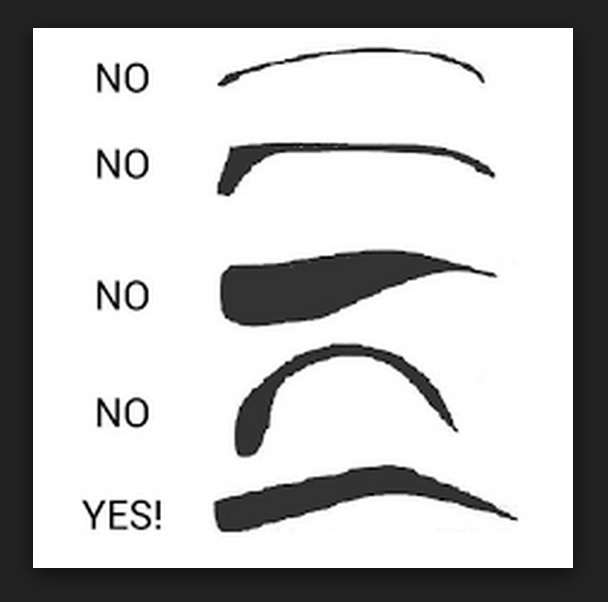
Those pics are from internet, as you can see the shape is similar, hairs from the low part and hairs from the upper part.
Another pic from internet.... shape is all in a face!
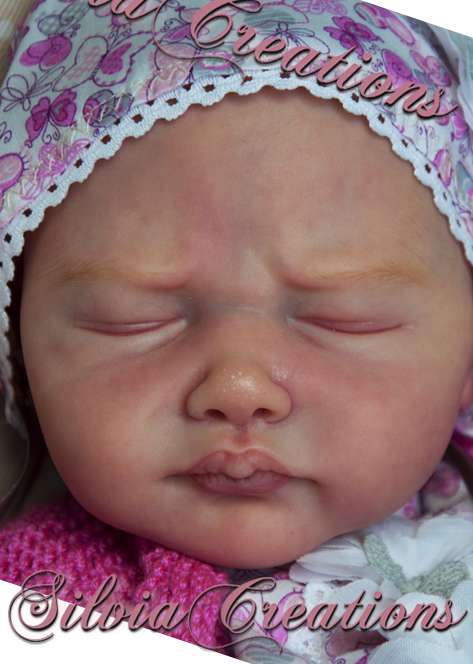
Here samples on my painted eyebrows.


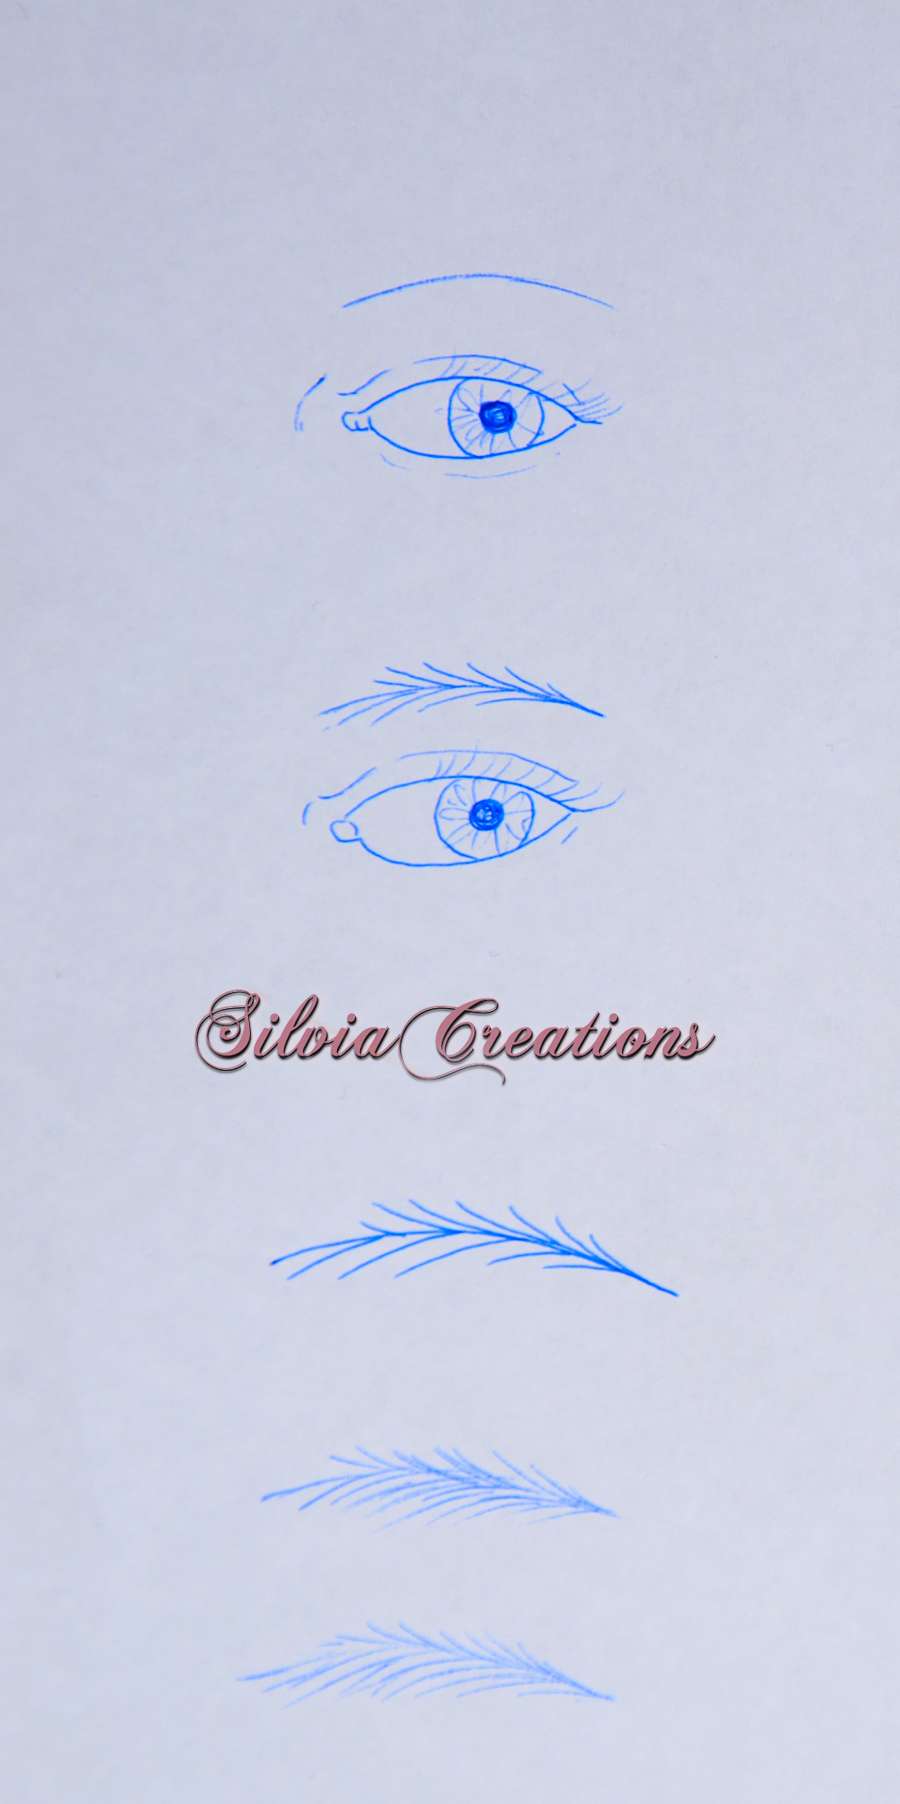
4. Where do I start to draw the hairs that go down?
Well, here is one of the technical parts that are a bit complicated, the eyebrows have a curve shape, so well, as you saw the highest point of the eyebrow starts when we draw the hairs down in the upper part. How you can know where to start? There's a simple guide to visualize better, it's something like this. (picture found on internet - this is called the gold section)
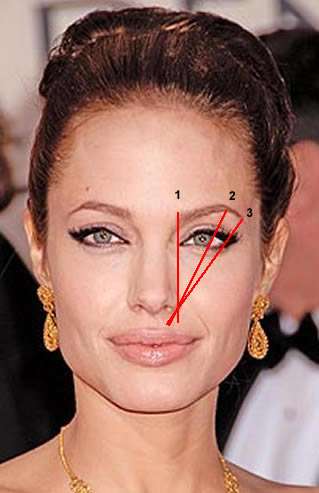
This is an easier way: find the middle of the eye (from corner to corner) - now find a middle point between that point and the end of the eye. In summary, closer to end, like on Angelina face.

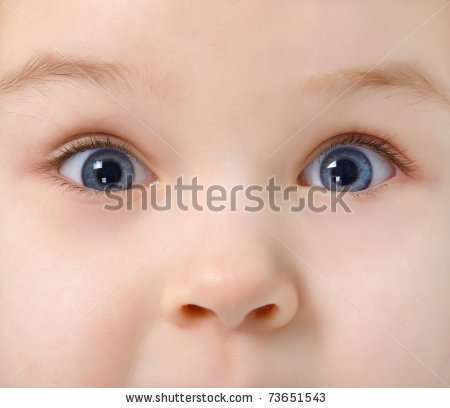
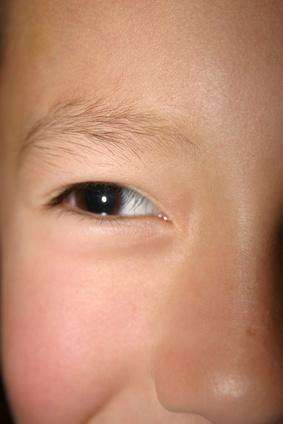
Look again at this real child eyebrows, the highest point is closer to the end.
Now you should 'see' the basic guide shape on this pictures. Examples of my eyebrows.

5. Tips on colors.
For paint my eyebrows I put directly from the paint pot a bit on my glass bowl, I put it in a corner of the bowl wall so I put some thinner on the base so I can dip with the pencil a bit of thinner to make my paint thin. I have always near an sponge to quite excess of paint if is necessary. Also, each time I take paint I discharge a bit of paint from the brush in a kitchen towel, just a dip on it.
MY COLORS:
Black hair: black and some little strokes with flesh 08 to add dept.
Brown hair (for Chocolate brown color, Deep Dark Brown): put umber color in bowl, now add a touch of blue, mix. Now add a little little touch of black. Your paint won't turn orange on the vinyl. Some flesh 08 strokes to add dept.
Medium blonde hair: put umber color in bowl, now add a touch of blue, mix. Some flesh 08 strokes to add dept.
Carrot hair: umber. The paint will looks orange - carrot in the vinyl. Some flesh 08 strokes to add dept.
Blonde hair: put sienna color in bowl, now add a touch of umber, mix. Now add a little touch of flesh 08, mix again. Some flesh 08 strokes to add dept.
Pale blonde hair: directly raw flesh 08.
Hope this tutorial help you and remember eyebrows are a difficult part of reborning. I spend several time on them and sometimes I have to rubb off them and start again, so, it's normal some days they be a pain in the butt. Also, this tutorial is my way of make eyebrows from my anatomy draw studies.
Please feel free to post your pics here if you decide to practice with my tutorial.
1. Step 1, where to place the eyebrows.
I have to say that lot of ladies put the eyebrows in the wrong place lot of times, so I want to tell you some tips to place them near to the perfect location. Most of kits have the superciliary ridges (the brow bone) well defined in the sculpt so in this case is easy to place the eyebrow in the correct size. For example:
In this case, Grace by Tina Kewy has the superciliary ridges well marked so is easy to place the eyebrow.
For example, other kits that have the brow bone well defined can be: Frieda by Karola Wegerich, Michelle by Evelina Wosjnuk, Will by Natalie Scholl, Reese by Andrea Arcello, Esme by Laura Lee Eagles, Lillebror and Sili by Sabine Altenkirch, Angel by Olga Auer, Livia by Gudrun Legler, Amber by Pat Moulton... just if you search on google for the blank kit you have to notice the bone.
In other cases the brow bone is not so marked or is marked more generally and here is when some artists are lost. Well, there's some complicated technical measures to place eyebrows in a face as our faces are composed by complicated system called golden section, but that's anatomy and it's complicated, so I have make an easy way you can place them very near to the correct place with some easy lines.
A clear case is Kase asleep by Realborn-Bountiful baby. Other faces similar to this are Leelou by Cassie Brace, Eliza by Donna Rubert, Pixie by Bonnie Brown, Birdy by Sandy Faber, Nicky by Christa Goetzen, Asher by Realborn-BountifulBaby ... etc
Here you can see the superciliary ridges are marked, but not the brow bone to place the eyebrows, in general, that faces are more relaxed than the ones that have it marked, as the muscle is relaxed too.
Then, I have make this easy diagram to decide where to put them. Just find the lacrimal and make an imaginary line. Now find the point where the bone starts to bump (in the pic above is just where the shadow ends and the brow bone bump out) and make another imaginary line. Now find a place in the middle of that two lines. **Attention! - sometimes that line can be just on the middle or can be a bit nearer to the upper line. This depends on the face, on the space between eye and brow bone, etc, so just is an guide to use when you have doubts**
An example on Leelou by Cassie Brace.
Then you can find the aproximate area to place your eyebrows. In an open eye baby should be the same, just the eyebrows will appear a bit close to the eyelide, but it's normal, the process is the same. Anyway if you feel they are very very close just put them some milimeters up. **There's an example on Wilma by K.Wegerich, wich have the brow bone marked and you can see is just an optical effect as on open eye babies brows looks closer - this picture have been retouched to show you the effect**
2. Lenght, and shape.
Now you have marked your place you have to know the lenght. Usually the lenght is from corner to corner to the eye, from the lacrimal to the corner. BUT sometimes people have the eyebrows a bit more longer than the corner, so, ALL DEPENDS on the character you want to give your baby, the look, etc, So again, this is an aproximate guide. I have babies with eyebrows to corner to corner and others with more longer eyebrows, this long also will change the face of your baby so eyebrows give a nice personality to a face.
Now the shape, according to our imaginary lines the shape generally is a bit curve. You can see here again, the final shape is marked with dots.
3. Start to draw your eyebrows
For first times and for practice, you can mark the basic shape (like the dots in the pictures) to have it as a guide, when you have practice you maybe won't need the guide line.
Now we will add strokes in the lower part, closer to end will be shorter. Then we will add from the middle to the end, strokes up down, closer to the end they will be shorter too. This is the basic guide.
With the practice you will get a more natural shape and you will control better the strokes. Is not easy, this appears with lot and lot of practice. **ATTENTION: when you mark all these guide lines make it with very thin paint, when we be happy with the shape we can back and go over the strokes and mark them with a less thin paint to make the final eyebrows.**
Those pics are from internet, as you can see the shape is similar, hairs from the low part and hairs from the upper part.
Another pic from internet.... shape is all in a face!
Here samples on my painted eyebrows.
4. Where do I start to draw the hairs that go down?
Well, here is one of the technical parts that are a bit complicated, the eyebrows have a curve shape, so well, as you saw the highest point of the eyebrow starts when we draw the hairs down in the upper part. How you can know where to start? There's a simple guide to visualize better, it's something like this. (picture found on internet - this is called the gold section)
This is an easier way: find the middle of the eye (from corner to corner) - now find a middle point between that point and the end of the eye. In summary, closer to end, like on Angelina face.
Look again at this real child eyebrows, the highest point is closer to the end.
Now you should 'see' the basic guide shape on this pictures. Examples of my eyebrows.
5. Tips on colors.
For paint my eyebrows I put directly from the paint pot a bit on my glass bowl, I put it in a corner of the bowl wall so I put some thinner on the base so I can dip with the pencil a bit of thinner to make my paint thin. I have always near an sponge to quite excess of paint if is necessary. Also, each time I take paint I discharge a bit of paint from the brush in a kitchen towel, just a dip on it.
MY COLORS:
Black hair: black and some little strokes with flesh 08 to add dept.
Brown hair (for Chocolate brown color, Deep Dark Brown): put umber color in bowl, now add a touch of blue, mix. Now add a little little touch of black. Your paint won't turn orange on the vinyl. Some flesh 08 strokes to add dept.
Medium blonde hair: put umber color in bowl, now add a touch of blue, mix. Some flesh 08 strokes to add dept.
Carrot hair: umber. The paint will looks orange - carrot in the vinyl. Some flesh 08 strokes to add dept.
Blonde hair: put sienna color in bowl, now add a touch of umber, mix. Now add a little touch of flesh 08, mix again. Some flesh 08 strokes to add dept.
Pale blonde hair: directly raw flesh 08.
Hope this tutorial help you and remember eyebrows are a difficult part of reborning. I spend several time on them and sometimes I have to rubb off them and start again, so, it's normal some days they be a pain in the butt. Also, this tutorial is my way of make eyebrows from my anatomy draw studies.
Please feel free to post your pics here if you decide to practice with my tutorial.